
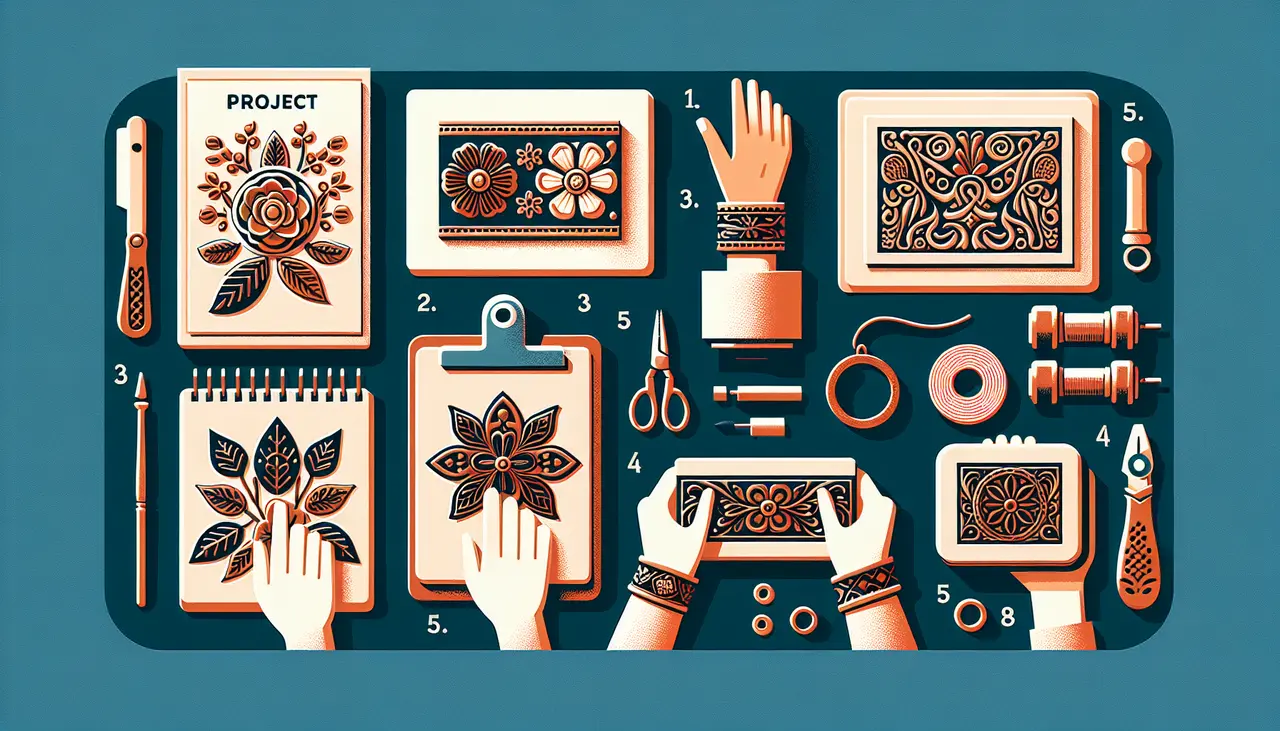
5 Creative Projects You Can Do at Home with Embossing Tools
Introduction to Embossing: Unleash Your Creativity at Home
Embossing is a simple yet magical technique that can transform plain paper into stunning art with texture and depth. Think of it as raising some areas of your paper to create cool designs that pop out. You don’t need to be an artist or a pro; with just a few basic tools, you can dive into the world of embossing from your own home. Whether you’re crafting personalized greeting cards, adding flair to your scrapbook, or decorating your journal, embossing brings a touch of elegance and creativity. All you need is an embossing pen, powder, and a heat source, and you’re set to make art that impresses. So, ready to unleash your creativity and make something beautiful? Let’s get embossing!
Custom Greeting Cards: A Personal Touch
Creating custom greeting cards with embossing tools is a fun and unique way to show you care. Skip the store-bought ones and make something special. Here’s how: First, choose a cardstock color that speaks to you. Then, with your embossing tool, gently press your chosen design or message into the paper. Watch as your words or patterns raise to form a tangible, elegant effect. Remember, the key here is pressure and patience. You can add colors or leave it classic and simple. Whether it’s a birthday, holiday, or just because, your embossed card will surely stand out, making the receiver feel truly valued. Plus, it’s a great way to test your creativity and perhaps discover a new hobby.
Embossed Scrapbook Covers: Preserve Your Memories
Embossing scrapbook covers is a fantastic way to give your memories a personal touch that stands out. All you need is an embossing tool, some creativity, and you’re ready to go. Start by choosing a cover that represents your memories. Then, use your embossing tool to gently press designs or lettering into the cover, adding depth and texture that you can see and feel. It’s like turning your scrapbook into a treasure chest of your favorite moments. Whether you prefer intricate patterns or simple, bold statements, the result is a custom, eye-catching scrapbook cover that speaks volumes about the memories inside. No need for fancy skills, just your imagination and the willingness to experiment. This project not only protects your photos and memorabilia but also turns your scrapbook into a unique piece of art that you’ll cherish for years.
DIY Embossed Bookmarks: Unique Gifts for Book Lovers
Book lovers rejoice! With embossing tools at hand, creating DIY embossed bookmarks is not only simple but can turn into unique gifts. Here’s the low-down: First, grab some cardstock or heavy paper – this will be your canvas. Next, choose an embossing stencil with a design that speaks to you. You’ll also need an embossing pad and powder. Press the stencil onto the pad, then onto your bookmark. Sprinkle the powder over the wet ink, shake off the excess, and apply heat with an embossing gun. The result is a raised, glossy design that pops. Personalize each bookmark with colors or add names to make them extra special for your bookworm friends. It’s a straightforward process that packs a punch in creativity and thoughtfulness.
Decorative Embossed Aluminum Art: Easy and Chic
Creating decorative embossed aluminum art is not just easy, it’s a stylish way to add a personal touch to your home décor. To start off, grab a piece of aluminum foil, thicker if possible, for better texture and durability. Place the foil over a soft, padded surface like a stack of newspapers or a foam sheet. This setup allows the embossing tool to press designs into the aluminum without ripping it. Now, with a stylus or a dull pencil, sketch your design directly onto the foil. You can go for simple patterns like flowers and leaves, or something more intricate to match your personal style. After your design is in place, use the embossing tool to trace over it, pressing down to create the raised effect. You can also add color to your art using permanent markers, giving it a vibrant look before framing. To finish, mount your embossed art on a contrasting background and frame it. This project is not only economical but also a fantastic way to create your own sophisticated wall art with minimal tools and effort.
Personalized Embossed Leather Tags: For Style and Organization
Creating personalized embossed leather tags is not only a way to add a touch of style to your belongings but also a smart method to keep things organized. With embossing tools in hand, you can transform regular leather scraps into sophisticated tags for everything from your keychains and luggage to notebooks and gear. Start with a small piece of leather; pick a size that works for what you’re tagging. Next, choose your design or initials that you’d like to emboss. With a simple press and release action using your embossing tool, your design gets imprinted onto the leather, giving it a raised, distinctive look that’s both elegant and professional. Remember, the beauty of embossing leather is in the detail and texture, so take your time to ensure precision. Once embossed, punch a hole for a string or a ring, and voilà, you’ve created a personalized, stylish, and functional leather tag. This project doesn’t just elevate your items’ aesthetics; it’s a practical way to ensure everything finds its way back to you, be it in the office or a travel hub.
Choosing the Right Embossing Tools: A Beginner’s Guide
To dive into the world of embossing, getting the right tools is your first step. Embossing, simply put, is a technique to create raised or recessed designs on paper, leather, and other materials. For starters, you’ll need two main items: an embossing pen and an embossing powder. The pen works like a magic wand, letting you draw or trace the design you want. And the powder? That’s where the magic happens. After applying it over your pen marks, you use heat to melt it, resulting in a cool, raised effect.
But, let’s not stop there. Your choice of tools can make or break your project. Heat guns, for instance, are better than hair dryers because they distribute heat evenly and at the right temperature to melt the powder without blowing your design away. Think of it like cooking; the right temperature can turn your dish from okay to amazing.
Paper quality matters too. Thicker papers hold up better under the heat and give you a more professional finish. It’s like picking the perfect canvas for your masterpiece.
Lastly, don’t skimp on the embossing powders. They come in all sorts of colors and finishes – metallic, glitter, and even glow-in-the-dark. Experimenting with these can turn your project from good to wow.
In the end, remember, great tools don’t have to break the bank, but investing in quality basics can elevate your embossing projects from kindergarten craft to gallery-worthy art. Keep it simple as you start, learn your tools, and before you know it, you’ll be embossing like a pro.
Tips and Tricks for Successful Embossing Projects
When diving into embossing projects at home, remember a few tips and tricks to ensure success and add that extra sparkle to your creations. First up, always use a high-quality embossing powder; this makes a significant difference in the finish and durability of your project. Make sure your ink is embossing-friendly. It should be sticky so the powder can adhere properly before you apply heat. Speaking of heat, invest in a good heat gun. Hairdryers won’t work—they blow away your powder. Keep the gun moving in small circles to avoid overheating any area. Experiment with different surfaces. Embossing isn’t just for paper; try it on glass, metal, or fabric to see how each reacts and expands your creative horizons. Lastly, practice makes perfect. Don’t be afraid to try different techniques, mixing powders for custom colors or layering for a more dramatic effect. With each project, you’ll refine your skills. Dive in, the world of embossing awaits!
Taking Care of Your Embossing Tools: Maintenance Basics
Keeping your embossing tools in tip-top shape isn’t rocket science. First things first, make a habit of cleaning them after each use. Simply wipe them down with a soft, dry cloth to remove any residue. If your tools have picked up some stubborn ink or materials, a gentle rub with a slightly damp cloth should do the trick. Avoid harsh chemicals; they’re more trouble than they’re worth. Next up, storage is key. Keep your tools somewhere dry and cool. Moisture is the enemy here; it invites rust and damage. For punches and metal tools, a light coat of machine oil can fend off rust. Just remember, a little goes a long way. Lastly, every so often, do a check-up of your tools. Look out for any signs of wear and tear. Dull blades or worn-out points? It might be time for a replacement or a sharpener. Regular maintenance keeps your tools ready whenever creativity strikes. Simple, right?
Wrap-Up: Unlocking the Potential of Embossing Tools for Creative Projects
So, we’ve talked your ear off about embossing tools and all the cool stuff you can do with them right at home. With these tools, your creativity isn’t just a spark; it’s a blazing fire. From making fancy cards that impress your friends to customizing your journals, and even adding a personal touch to your bookmarks, there’s no limit. The trick is to dive in, experiment, and let your imagination lead the way. Remember, the cost of embossing tools ranges from affordable to a bit pricey, but picking the right tool for the right project makes all the difference. And guess what? The satisfaction of creating something unique with your own hands? Priceless. So, grab those tools, push your creativity, and transform the ordinary into something extraordinary.