

Foil Stamping vs Digital Foil: Which Method Wins?
Choose hot (traditional) foil stamping when tactile luxury and a pressed deboss matter most; choose digital foil when you need short runs, personalized names, or a fast turnaround. That single rule covers the majority of decisions for individuals and small businesses working on invitations, business cards, and event stationery.
Two quick decision axes to keep in mind:
- Run size and personalization: Digital foil is your friend for fewer than 100 pieces or any project with variable names, addresses, or custom details. Hot foil earns its setup cost when you’re printing a larger static design and want that unmistakable pressed-in shine.
- Tactile depth and luxury positioning: Hot foil physically displaces paper fibers, creating a deboss you can feel with your fingertip. Digital foil sits on top of the surface. Both look beautiful, but only one feels like a luxury keepsake.
Before you commit to either method, ask your printer for a test stamp on your exact paper stock. That one step saves you from surprises at press time.
Table of Contents
- How does hot foil stamping work?
- What makes digital foil different from traditional foil?
- What is cold (inline) foil, and when does it make sense?
- How do the three methods compare visually and by feel?
- What do foil stamping costs actually depend on?
- How should you set up your artwork file for foil?
- How do you decide which foil method is right for your project?
- What does the research say about foil’s impact on perceived value?
- Key Takeaways
- A note from Invitationbox on choosing your finish
- Ready to bring your foil project to life with Invitationbox?
- Further reading and authoritative sources
How does hot foil stamping work?
Hot foil stamping is the original, time-tested method. A custom metal die is engraved with your design, heated to a precise temperature, and pressed against a foil ribbon and your substrate simultaneously. The heat and pressure bond the foil to the paper while physically compressing the fibers beneath the design, creating that signature tactile deboss.
Pros:
- Densest metallic brilliance and reflectivity of any foiling method
- Tactile deboss that reads as premium to the touch
- Works beautifully on textured, uncoated, and heavyweight boards
- Extremely durable once bonded; resists rubbing and handling
Cons:
- Custom metal die adds upfront tooling cost (typically quoted separately by your printer)
- Longer lead time to fabricate the die before printing begins
- Design changes require a new die, making heavy personalization expensive
- Not practical for variable-data or short personalized runs
Best uses: Upscale wedding invitations, luxury business cards, premium packaging, thick cotton or uncoated boards, and any piece where the tactile feel is part of the brand message.
The hot foil process, step by step:
- Finalize your design and send artwork with a dedicated foil layer (spot color or separate plate file).
- Your printer engraves or etches a custom metal die from your artwork.
- Press makeready: the die is mounted, temperature is calibrated, and foil ribbon is loaded.
- Test stamps are pulled on your chosen stock and reviewed for registration and adhesion.
- Production run proceeds; finished sheets are inspected and trimmed.
What makes digital foil different from traditional foil?
Digital foil eliminates the metal die entirely. Instead, a digital press lays down a toner or adhesive layer in the exact shape of your foil design, and then a foil transfer film is applied over that layer using heat. The foil bonds only where the adhesive exists, then the carrier film peels away. No die, no long makeready, no minimum run.
Pros:
- No tooling cost; setup fees are minimal compared to hot foil
- Fast turnaround, often same-day or next-day for small quantities
- Supports variable data: every piece can carry a unique name, date, or address in foil
- Easy to iterate; design changes cost nothing extra in tooling
Cons:
- Finish tends to be flatter and slightly less reflective than hot foil
- No physical deboss; the foil layer sits on the surface rather than pressing into it
- Substrate compatibility is narrower; very textured or uncoated stocks can cause adhesion issues
- Per-piece cost can rise quickly on larger runs once hot foil’s die cost is amortized
Personalization examples: A set of 50 wedding place cards, each with a guest’s name in gold foil. A batch of 30 holiday cards with individual family names. Prototype packaging for a product launch where you need to test three different foil color options before committing to a full run.
The digital foil process, step by step:
- Prepare your file with a dedicated foil layer (100% black or a named spot color) separate from your base artwork.
- Send the file to a digital press; the printer outputs the adhesive/toner layer onto your stock.
- Foil transfer film is applied under heat; the carrier peels away, leaving foil bonded to the adhesive.
- Pull a proof and check registration, foil coverage, and adhesion before approving the full run.
Pro Tip: Ask your printer whether they use a toner-based or UV adhesive digital foil system. Toner-based systems work on a wider range of stocks; UV adhesive systems often produce a sharper edge on coated papers.
What is cold (inline) foil, and when does it make sense?
Cold foil is an industrial option built into offset printing presses. A UV-curable adhesive is printed in the foil pattern during the press pass, foil is applied inline, and the carrier film is stripped away, all in a single continuous run. There is no heat die and no separate offline foiling step.
The speed advantage is real. Cold foil runs inline significantly faster than hot foil, enabling higher-speed production for large packaging runs, which translates directly into lower per-unit cost on very large packaging runs.
Key characteristics:
- Produces a flat, mirror-like metallic finish without any tactile deboss
- Supports CMYK overprinting on top of the foil layer, enabling full-color metallic effects
- Requires smooth, coated substrates; textured or uncoated stocks cause adhesion failures
- Best suited for high-volume packaging, labels, and commercial print runs where per-unit cost is the primary concern
Cold foil is rarely the right choice for the personalized stationery and short-run projects that most individuals and small businesses are working on. It shines in contexts like cosmetic packaging, wine labels, and retail boxes where tens of thousands of identical pieces justify the press setup.
How do the three methods compare visually and by feel?
The differences between methods are most obvious when you hold finished pieces side by side.
- Tactile deboss: Only hot foil creates a physical impression in the paper. Traditional foil block produces a deep pressed finish that digital foil simply cannot replicate, because digital relies on an adhesive layer rather than displacing paper fibers.
Durability in real handling: Hot foil bonds are highly resistant to rubbing and folding once cured. Digital foil can be more susceptible to scuffing on high-traffic pieces like business cards. For either method, a soft-touch laminate or aqueous coating over the foil area adds meaningful protection during mailing and handling.
When previewing foil effects, request a printed sample on your actual stock rather than relying on a screen mockup. Colors and reflectivity shift dramatically between paper types, and what looks gold on a coated sheet can read as bronze on an uncoated cotton card.
What do foil stamping costs actually depend on?
Cost is where foil stamping vs digital printing decisions get concrete. The methods have very different cost structures, and the right choice depends on your run size.
The main cost drivers for hot foil:
- Custom metal die fabrication (a one-time tooling charge per design)
- Foil area coverage (larger or more complex designs use more ribbon)
- Press makeready time and test stamps
- Paper stock and caliper (heavier boards require more pressure and slower speeds)
- Number of foil colors (each color requires a separate die and press pass)
- Finishing passes such as die-cutting or laminating after foiling
Comparison by key dimensions:
| Dimension | Hot Foil Stamping | Digital Foil | Cold Inline Foil |
|---|---|---|---|
| Setup cost / tooling | High (custom metal die required) | Low (die-less; minimal setup fee) | Moderate (press makeready; no die) |
| Best for | Larger static runs, luxury tactile pieces | Short runs, personalized / variable-data | High-volume packaging runs |
| Per-piece cost behavior | Decreases as run size grows | Stays relatively flat; rises vs hot foil at scale | Lowest per-unit at very high volumes |
| Visual brightness and tactile depth | Highest reflectivity; physical deboss | Bright but flatter; no deboss | Flat mirror finish; no deboss |
| Speed / turnaround | Longer (die fabrication adds days) | Fast (often 1–2 business days) | Fastest per unit inline |
| Substrate compatibility | Broad: coated, uncoated, textured, boards | Narrower: coated and smooth stocks preferred | Smooth coated stocks only |
| Personalization / variable data | Not practical | Fully supported | Not supported |
| Durability / handling | Excellent; highly rub-resistant | Good; benefits from protective coating | Good on coated stocks |
Qualitative thresholds to guide your decision: Hot foil favors larger, static runs where the die cost is spread across many identical pieces. Digital foil favors short, variable runs where no two pieces are exactly alike. Ask your printer for a break-even estimate: “At what quantity does hot foil become cheaper per piece than your digital foil pricing?”
Red flags that make hot foil expensive: Frequent small design changes, heavy personalization across the run, or very small foil areas that don’t justify the die cost. Digital foil can be unexpectedly costly at scale when per-piece pricing doesn’t drop the way hot foil’s does once tooling is amortized.
How should you set up your artwork file for foil?
Getting your file right before it reaches the printer saves time, money, and the frustration of a reprint. The process differs between hot and digital foil, but the core file-prep principles overlap.
File-prep checklist:
- Create a dedicated foil layer in your design file, clearly labeled “Foil Plate” or “Foil Layer.”
- Fill all foil elements with 100% K (black) or a named spot color such as “FOIL” so the printer can isolate the plate.
- Outline or expand all fonts on the foil layer; never leave live type in a production file.
- Set trim marks and maintain a minimum 0.125-inch safe zone inside the trim edge for foil elements.
- Use vector artwork for all foil elements; raster images in the foil layer cause soft edges and inconsistent bonding.
- Confirm with your printer whether they need a separate PDF for the foil plate or a layered native file.
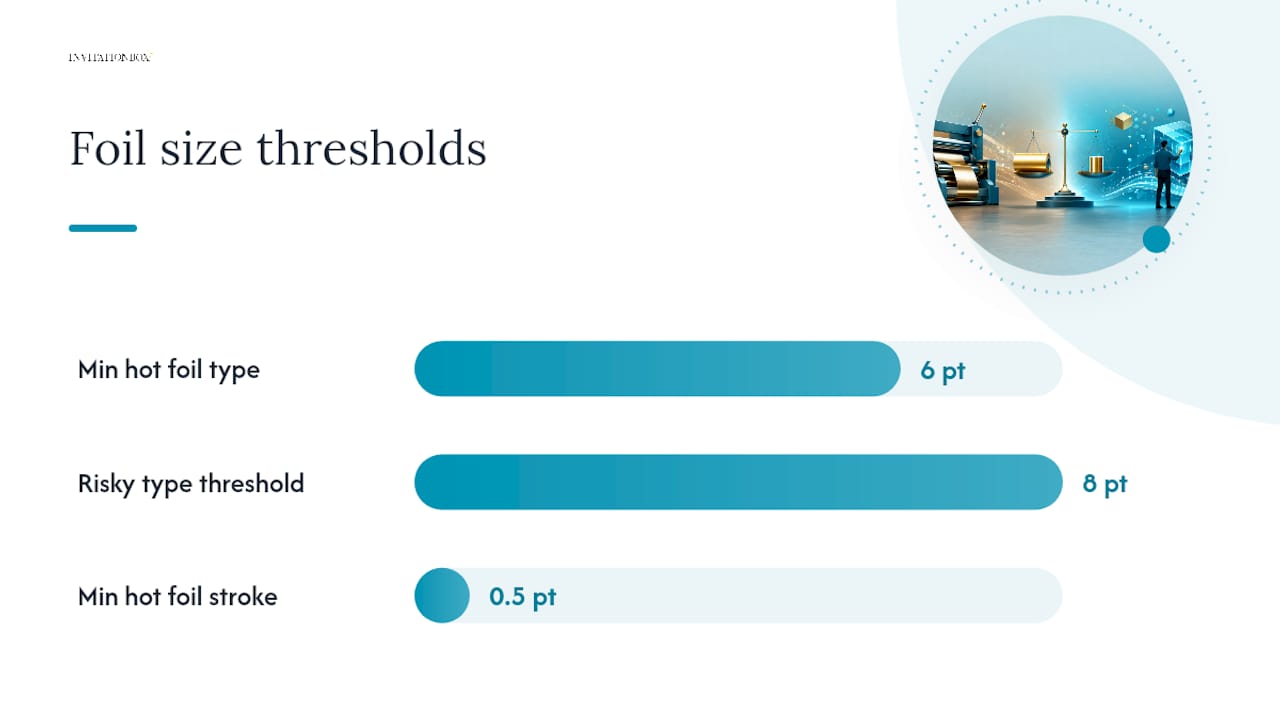
- For hot foil, verify that no foil element is smaller than 6 pt type or finer than 0.5 pt stroke, as the die may not hold fine detail under pressure.
Typography guidance: Fine serif fonts in small sizes are the most common source of foil disappointment. At sizes below 8 pt, thin strokes can fill in under hot foil die pressure or lose crispness with digital foil adhesive. Bold, clean letterforms and generous spacing between characters give you the best result.
Proofing steps:
- Request a physical test stamp (hot foil) or a printed proof sheet (digital foil) before approving the full run.
- Check registration between the foil layer and any underlying printed elements under bright light and at an angle.
- Evaluate the proof under the same lighting conditions where your finished piece will be seen (natural light vs. indoor incandescent).
Sample printer instruction you can copy and use:
How do you decide which foil method is right for your project?
Work through this checklist before your first printer conversation. It takes about five minutes and will make every quote you receive more accurate.
Decision checklist:
- Run size: Under 100 pieces? Digital foil is almost always more cost-effective. Over 500 identical pieces? Ask your printer for a hot foil break-even quote.
- Personalization need: Any variable data (names, addresses, unique codes)? Digital foil only.
- Tactile effect goal: Do you need a pressed, felt deboss? Hot foil only.
- Substrate chosen: Textured, uncoated, or heavyweight board? Hot foil is safer. Smooth coated stock? Either method works.
- Timeline: Need pieces in 48–72 hours? Digital foil. Can you wait 7–14 days for die fabrication? Hot foil is on the table.
- Budget: Fixed low budget with no room for tooling? Digital foil. Budget for a one-time die that pays off over repeat runs? Hot foil.
Questions to ask your printer:
- What is the die cost, and does it apply to reorders?
- What is your minimum run for hot foil vs. digital foil?
- Can I see a test stamp or proof on my specific stock before I approve?
- What foil colors do you stock, and what is the lead time for specialty colors?
- Do you recommend a protective coating over the foil for mailed pieces?
Red flags to watch for:
- A printer who won’t provide a test stamp on your actual stock before a full run
- A quote that bundles die cost into the per-piece price without breaking it out separately
- No clear answer on substrate compatibility for your chosen paper
- Vague turnaround estimates with no milestone for die approval
What does the research say about foil’s impact on perceived value?
Academic research from the Rochester Institute of Technology found that decorative foil stamping can significantly affect consumer attention in shelf contexts, though the effect varies by product category. An academic study found that foil stamping can affect consumer attention for some product categories, but the effect is not uniform across all contexts. The practical takeaway: foil is not a guaranteed attention-getter in every context, which is exactly why testing in context matters before scaling.
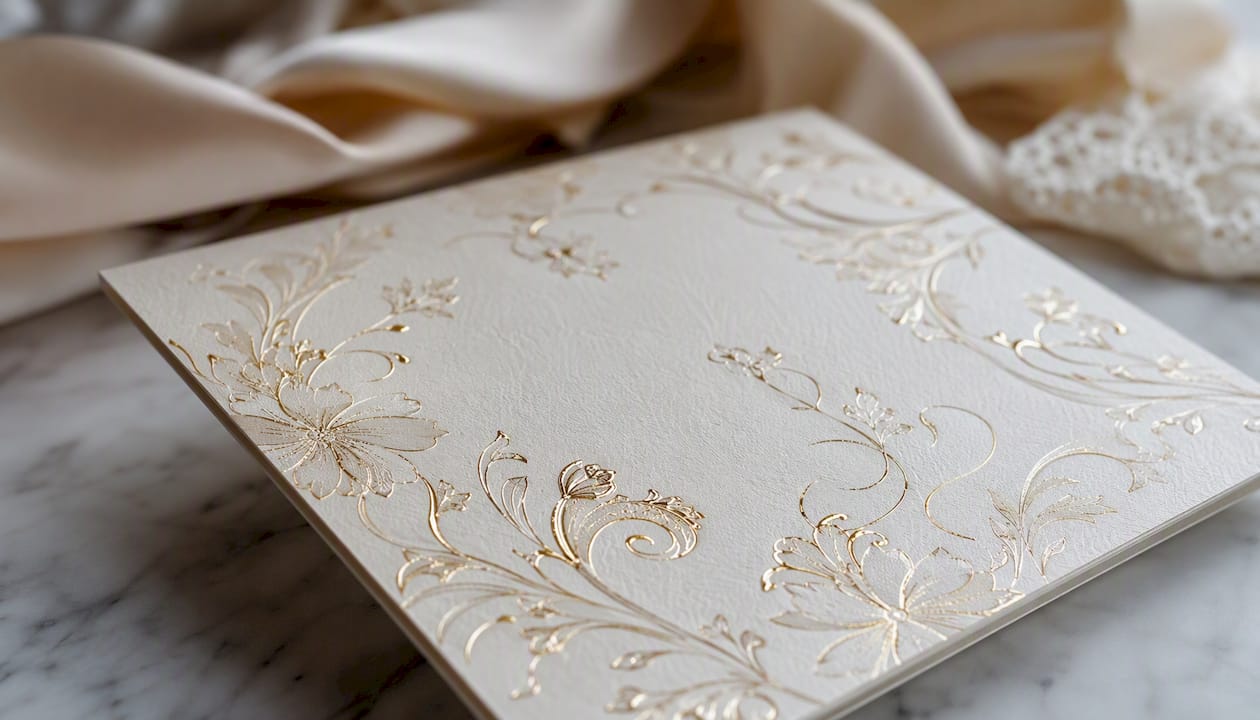
Industry practitioners consistently observe that hot foil’s tactile deboss tends to increase perceived luxury and shareability compared to flat digital foil. When someone picks up a hot-foiled wedding invitation or business card, the physical impression signals quality in a way that a screen or even a flat printed sample can’t fully convey.
Cold foil’s inline speed advantage at 50–60 meters per minute versus hot foil’s 20–30 meters per minute is meaningful for packaging runs in the tens of thousands, but it doesn’t translate into a benefit for the short, personalized runs that most stationery buyers are planning.
Practical takeaways from the research:
- Test foil effects with in-context mockups before committing to a full run, especially for packaging or retail applications.
- For premium stationery and event pieces, hot foil’s tactile quality often justifies the tooling cost because the physical experience is part of the product’s value.
- When foil effects are uncertain, run a small digital foil proof batch first, then scale to hot foil once the design is locked.
Key Takeaways
Choose your foiling method based on run size, personalization needs, tactile goals, and substrate: hot foil for luxury depth on larger static runs, digital foil for short personalized pieces with fast turnaround.
| Point | Details |
|---|---|
| Run size drives the decision | Digital foil suits runs under 100 pieces; hot foil becomes cost-effective as quantities grow and the die cost is spread across more units. |
| Only hot foil creates a deboss | Hot foil physically presses into paper fibers; digital foil sits on the surface and cannot replicate that tactile depth. |
| Test before you commit | Always request a test stamp or digital proof on your exact stock before approving a full run to catch adhesion or registration issues early. |
| Cold foil is an industrial tool | Cold inline foil runs at 50–60 meters per minute and suits high-volume packaging, not short personalized stationery runs. |
| Invitationbox products pair with both methods | Custom stampers and embossers from Invitationbox complement foil-finished stationery, adding a coordinated tactile layer to invitations, cards, and event pieces. |
A note from Invitationbox on choosing your finish
At Invitationbox, we’ve spent over 19 years helping customers create stationery that feels as special as the moments it marks. The foil conversation comes up often, and our honest answer is always the same: the right finish depends on your specific project, your paper, and how you want the piece to feel in someone’s hands.
For customers pairing foil finishes with custom stampers and embossers, we love seeing pieces like the Corner Scrolls Square Stamper or Embosser and the Classic Scroll Square Stamper or Embosser used alongside hot-foiled invitations, where the pressed emboss and the foil deboss create a layered tactile experience that feels genuinely luxurious. The Extra Ornamental Stamper or Embosser pairs especially well with ornate foil designs on heavyweight card stock.
For lighter, more playful projects, the Horseshoe Stamper or Embosser, Jolly Rogerette Stamper or Embosser, and Modern Scroll Stamper or Embosser work beautifully alongside digital foil accents on shorter personalized runs. Photo cards like the Fun Holiday Confetti Photo Card and the Believe Photo Card are natural candidates for a digital foil name or greeting accent.
If you’re unsure which finish direction suits your project, our team is happy to help you think it through.
Ready to bring your foil project to life with Invitationbox?
Foil finishes are most beautiful when the whole piece is designed with intention, from the paper stock to the stamper or embosser you pair alongside it. Invitationbox offers a full range of custom stampers for stationery that coordinate with foil-finished invitations, cards, and event pieces, giving your project a cohesive, polished look from envelope to card.
Whether you’re designing a set of personalized wedding invitations with hot foil accents or a short run of holiday cards with a digital foil name treatment, the right stamper or embosser ties the whole suite together. Browse the Corner Scrolls Square Stamper or Embosser and the Classic Scroll Square Stamper or Embosser as starting points, or explore the full collection to find the design that fits your vision. Place your order today and let your stationery make the impression it deserves.
Further reading and authoritative sources
- Foil Stamping: The Ultimate Guide to Premium Print Finishes in 2026 | Linemark
- Hot Foil vs Digital Foil — What’s the Difference? | TheFoilGuy
- Digital Gold Foil Printing / How foil stamping works | TheFoilGuy
- Foil stamping in packaging: definition, process, types & benefits — Arkay
- The Effect of Decorative Foil Stamping on Consumer Attention | RIT
- Foil Stamping in Packaging: Definition, Process, Types, and Benefits | Packhit
- A Touch of Foil: Traditional Foil Block vs Digital Foil | Northern Print Solutions
One final recommendation: Request printed samples from your printer on your chosen stock before finalizing any foil method. No guide, screen preview, or digital mockup replaces the experience of holding the actual finished piece in your hands.